Asbestos in Schools
Many schools in the UK have asbestos present in there buildings.
Learn more about your responsibility for managing asbestos in school and download the HSE’s free checklist supporting you in reviewing your asbestos procedures.
Many schools in the UK have asbestos present in there buildings.
Learn more about your responsibility for managing asbestos in school and download the HSE’s free checklist supporting you in reviewing your asbestos procedures.

In this blog post, we’ll look at the different types of fire extinguishers and their uses.
So, you can understand which types of extinguisher you need in your workplace.
And, importantly, know the correct extinguisher to use in the event of a fire!
In addition, you can find guidance on the different classifications of fires, when to tackle a fire and where to position your extinguishers.
We’ll kick off by discussing the classification of fires.
In the UK, fires are categorised depending on the source of fuel.
Below are the different classifications:
Class E doesn’t technically exist because electricity is a source of ignition rather than a fuel. However, electrical fires can electrocute those using an incorrect extinguisher. Therefore, these types of fire require special attention.
Note: Once you turn off the electricity supply, you can categorise the fire into one of the appropriate of the classes above depending on source of fuel.

Now, we understand the different classifications, we will look at which extinguishers we can use on each.
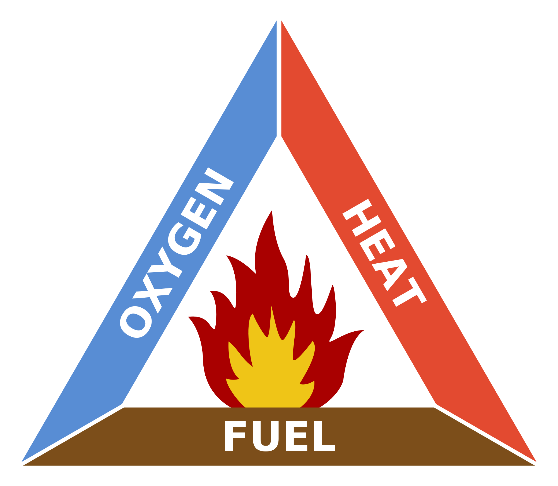
When extinguishing a fire your main aim is to remove one of the three elements of the fire triangle.
Oxygen, Heat or Fuel.
Fire extinguishers work in different ways to achieve this goal as you’ll see below.
Some cool the fire by removing the heat. Others smother the fire by removing oxygen. And, the rest starve the fire by creating a barrier between fuel and flames
So, let’s look at the different types of extinguisher and their uses.
We’ll start by looking at water extinguishers.
Of which, three important variants exist:

Used on: Class A fires
Don’t use on: Electrical fires (Class E – can lead to electrocution). Class B and C (spray can spread flames). Class D and F.
How it works: The water spray lowers the temperature of the burning material so the fire can no longer burn.
Method of Extinguishing Fire: Cooling
How to Identify: ‘Water’ written in white on a red background. See above picture.
Pros: Rapid extinguishing; no environmental impacts.
Cons: They only extinguish Class A fires
Used on: Class A fires
Don’t use on: Electrical fires (Class E – can lead to electrocution). Class B and C (spray can spread flames). Class D and F.
How it works: These extinguishers have a specific nozzle that works at high pressure. The resulting spray has a higher surface area than ordinary water extinguishers which increases the cooling rate and therefore the rate of extinguishing the fire.
Method of Extinguishing Fire: Cooling
How to Identify: ‘Aqua Spray’ written in white on a red background. See above picture.
Pros: More effective than a standard water extinguisher; no environmental impacts.
Cons: Again, they only extinguish Class A fires.
Used on: Class A, B, C, F and Class E (up to 1000V if dielectric tested to 35kV)
Don’t use on: Class D fires.
How it works: Deionised water passes through a supersonic nozzle which turns water into microscopic droplets. When in use, the fine mist suffocates and cools the fire.
Method of Extinguishing Fire: Cooling & Smothering
How to Identify: ‘Water Mist’ written in red on a white background. See above picture.
Pros: Covers a wide range of fire classes; no environmental impacts; Uses no chemicals so suitable for kitchens and food production facilities.
Currently, two types of powder extinguishers are available…

Used on: Class A, B, C fires. Class E fires (although, susceptible to reignition)
Don’t use on: Class D and F fires
How it works: The powder forms a barrier between fuel source and flames starving the fire.
Method of Extinguishing Fire: Starving the fire.
How to Identify: ‘Powder’ written in white on a blue background. See above picture.
Pros: They work on 3 most common classes of fire
Cons: Reignition can occur because the powder doesn’t absorb the heat; Dangers associated with inhalation (not recommended inside buildings or small spaces); messy after discharge.
Used on: Class D fires. M28 – Sodium, Magnesium, Aluminium, etc excluding Lithium. L2 – Sodium, Magnesium, Aluminium, etc including Lithium.
Don’t use on: Class A, B, C, E, F
How it works: A specially designed hose sprays the powder over the combustible metal. This creates a shield which prevents the metal from encountering the cause of combustion i.e. water/oxygen.
Method of Extinguishing Fire: Interfering with Chemical Reaction.
How to Identify: ‘Powder’ written in white on a blue background. Distinctive hose. See above picture.

Used on: Class A and B fires. Class E fires (up to 1000V if dielectric tested to 35 kV).
Don’t use on: Class C, D, F
How it works: Foam forms a barrier on the surface of the flammable liquid which prevents flammable vapours combusting. Similarly, with solid materials, the foam forms a barrier between the combustible material and the flames.
Method of Extinguishing Fire: Smothering and Starving.
How to Identify: ‘Foam’ written in red on a cream background. See above picture.
Pros: More versatile than water; more effective than water on Class A fires
Cons: Leaves a messy residue
Used on: Class B and E fires
Don’t use on: Class A, B, D, F
How it works: Carbon dioxide replaces oxygen thereby smothering the fire.
Method of Extinguishing Fire: Smothering
How to Identify: ‘Carbon Dioxide’ written in white on a black background. See above picture.
Pros: No messy residue
Cons: Can suffocate users in confined spaces; Carbon dioxide dissipates quickly leading to reignition in some cases.
Used on: Class F fires
Don’t use on: Class A, B, C, D or E fires
How it works: A fine mist helps cool the flames whilst chemicals react with the cooking fat/oil to produce a substance that creates a barrier between the flames and the oil (fuel source).
Method of Extinguishing Fire: Smothering
How to Identify: ‘Wet Chemical’ written in red on a yellow background. See above picture.

Used on: Small oil pan fires and people who have caught fire
Don’t use on: Class A, B, C, D, E and large Class F fires
How it works: Fire blankets smother fires by restricting their oxygen supply.
Method of Extinguishing Fires: Smothering
How to Identify: Red case with ‘Fire Blanket’ written in white.
We’ll finish our discussion about fire extinguishers with some general advice…
There are certain times when fighting a workplace fire is sensible and others when it’s not.
You’ll need to place your extinguishers in the right places so that you can use them effectively should a fire occur.
Below are some general guidelines to follow.
You should fix fire extinguishers to the wall or on a stand in their designated areas (which should be clearly visible). This is to avoid people moving them from the areas you need them most.
In addition, your extinguishers should be kept at a suitable distance from risk areas and along escape routes.
General guidance suggests placing extinguishers at the following distances from:
Adjust these down if you’ll need to get through doorways to the hazard as this will add crucial seconds.
Furthermore, each extinguisher should have a corresponding sign above it which details its contents and the classes of fires it extinguishes.
Extinguishers don’t last forever.
They each have a shelf life and need servicing annually by a competent person e.g. a fire extinguisher engineer.
And, if they are found to be damaged, discharged or cannot be used safely, they’ll need replacing.
Alongside an annual service, your responsible person should inspect your extinguisher(s) weekly or monthly to ensure they are in good working condition.
Then, after 5 years (10 years for CO2 extinguishers) your extinguishers need replacing regardless of condition.

Every extinguisher has a fire rating.
This rating contains a number and letter i.e. 13A.
The letter gives the fire classification (so here a Class A fire).
And the number notifies you about the size of fire it can extinguish (the larger the number the bigger the fire).
A fire extinguisher can have several ratings depending on which fire classes it can extinguish.
For example, a foam extinguisher will have 2 ratings; one for Class A fires and another for Class B fires.
After reading this post, you should have a better idea of which extinguisher (s) you need in your workplace.
And, you know which extinguisher to grab in the event of a fire.
Both of which help keep your workplace that little bit safer.
Did you learn something you didn’t know after reading this post?
If so, what was it? Let us know in the comments!
Risk assessment is the foundation of health and safety in the workplace.
But, how do you conduct a risk assessment? And, what are the best practices?
Through this painless process, set out in this blog, you can control the risks in your workplace.
In this post, I will break down the 5 key steps of a risk assessment, so, you can ensure your business is working safely.
I will begin by answering a few common questions, before moving on to the process of conducting a risk assessment.
The law requires employers to have suitable and sufficient risk assessments for their workplace.
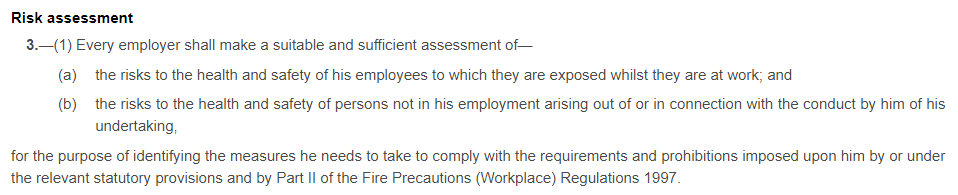
The Management of Health and Safety at Work Regulations 1999 states,
“3.—(1) Every employer shall make a suitable and sufficient assessment of—
(a)the risks to the health and safety of his employees to which they are exposed whilst they are at work; and
(b)the risks to the health and safety of persons not in his employment arising out of or in connection with the conduct by him of his undertaking”
As an employer, you don’t have to conduct the risk assessments yourself, but you must ensure that a competent person prepares them, and they meet the ‘suitable and sufficient’ criteria.
Note: If you employ fewer than 5 staff members, you don’t have to record any findings. However, you’ll still need to conduct a risk assessment.
So why has it become a legal responsibility? What purpose do they serve?
Let’s take a look…
A safer workplace starts with its risk assessments.
Why?
Because when you identify your hazards and risks, you can manage them.
They help you to:
So, let’s move on the all-important 5 steps.
Risk assessments are commonly split into 5 stages.
I will talk about these in more detail below, but, first, a couple of definitions.
Definition of a Hazard – Anything that can cause harm.
Definition of a Risk – The chance someone can be exposed to a dangerous situation.
To put this into context, a risk assessment identifies hazards and evaluates the likelihood these will cause harm and the potential consequences of this harm (i.e. the risk).
With that in mind, we move on to step 1 of a risk assessment.
Without knowing the hazards in your workplace, you cannot evaluate your risks.
A good place to start is by walking around your workplace and asking yourself what could cause harm.
Think about short-term hazards as well as longer-term hazards.
Then, talk to your employees and get their thoughts. Discuss with them the hazards they face regularly.
Top Tip: Lone workers and those who work off-site need consideration too.
Additionally, you should:
Write your observations down before moving on to create a comprehensive list of workplace hazards.
Remember, you do not have to plan for unforeseeable risk. Some hazards you can’t predict because they may only develop after certain incidents. As a result, you can’t plan for them.
So long as you have created ‘suitable and sufficient’ risk assessments, you won’t be liable.
Next, Step 2.
In this next step, you need to:
Ask yourself: Who could be harmed in the event of an accident?
Observations can easily be combined with the first step when you are busy putting together your list of hazards. Give special consideration to those who are at higher risk (i.e. pregnant women, young employees, those with disabilities, etc)
Note down your findings. These observations will help you when assessing the likelihood and consequences of harm occurring.
Next, start using a risk matrix to assess the risk of injury and illness
As discussed, Risk= Likelihood of harm * Consequence of harm.
| Likelihood | Consequence |
| 1 – Very Unlikely (1 in 1,000,000 chance) | 1 – Insignificant (no injury) |
| 2 – Unlikely (1 in 100,000 chance) | 2 – Minor (injuries requiring first aid) |
| 3 – Fairly Likely (1 in 10,000 chance) | 3 – Moderate (up to 3 days of absence) |
| 4 – Likely (1 in 1000 chance) | 4 – Major (over days of absence) |
| 5 – Extremely Likely (1 in 100 chance) | 5 – Fatal (death) |
So, a point scale becomes useful when analysing your risk. Take a look at our example below.
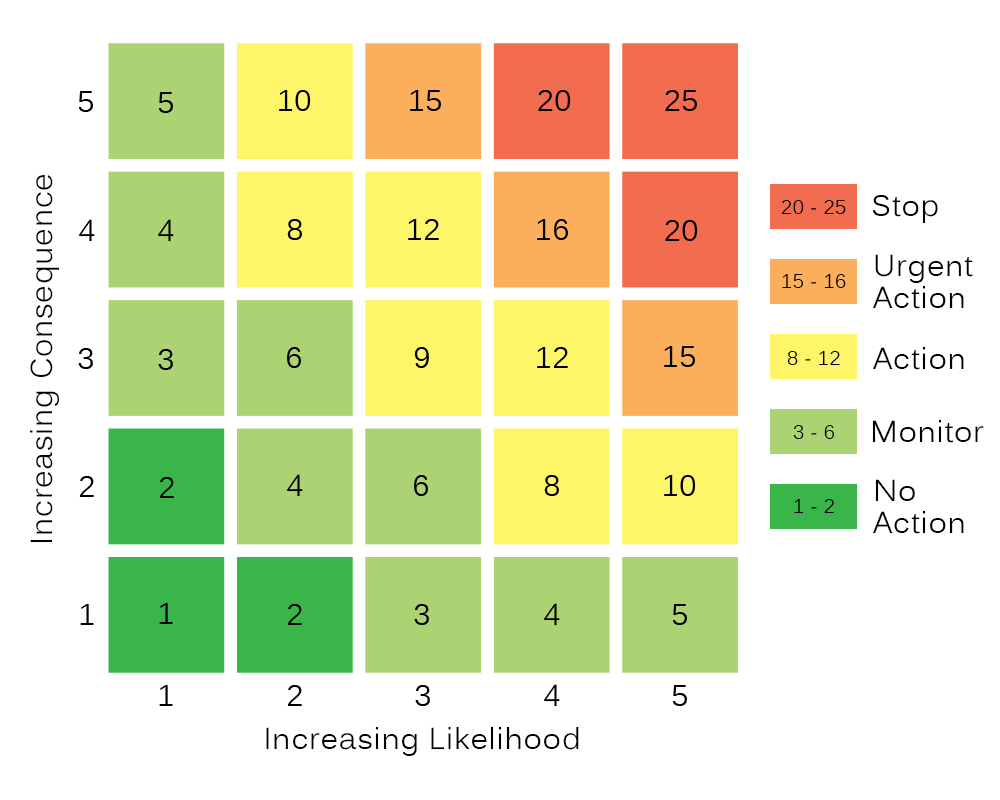
By multiplying the likelihood score and the consequence score, you can quantify the level of risk a hazard poses.
For example, if you have spotted a hazard which is:
Unlikely to cause harm (2), but,
could cause Major injury (4),
the overall risk score equals,
Risk= 2 x 4 = 8
By comparing this to a risk matrix you can see that this risk needs: Action
After the assessment stage, you need to evaluate each hazard and put control measures in place to manage them.
These measures can either:
Here’s where a hazard’s risk score is useful.
Use it when deciding which control measures would be adequate and appropriate.
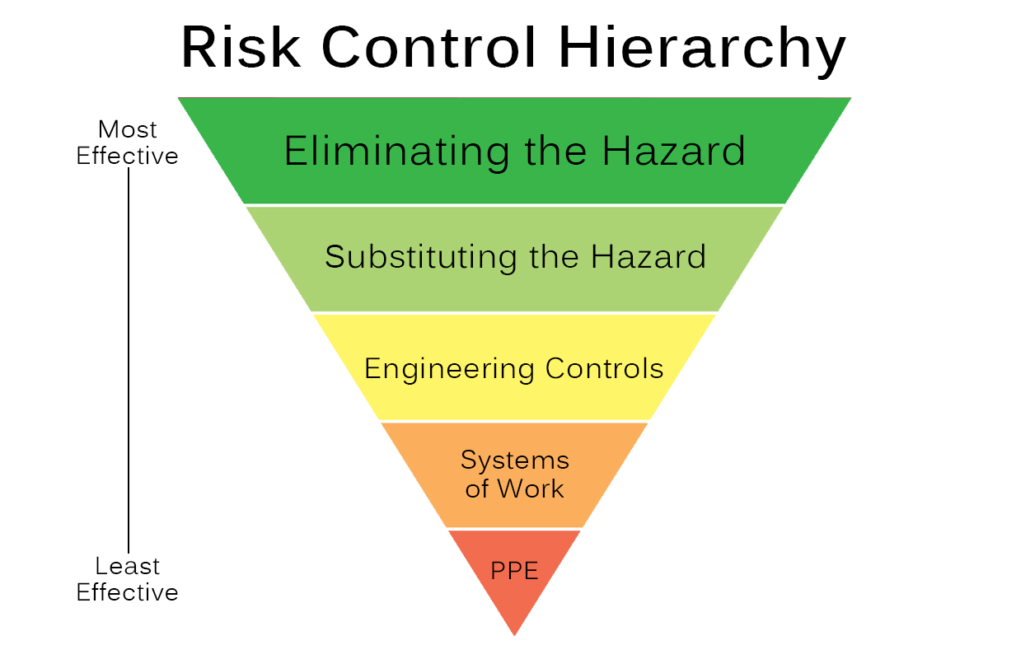
Which leads on to another important concept – The Risk Control Hierarchy.
Control measures that rely on people following them to the letter are the most fallible.
Therefore, eliminating a hazard is by far the safest thing to do.
However, at times this isn’t appropriate.
So, you’ve got to choose other methods of controlling the risk. This decision should follow the Risk Control Hierarchy.
Weigh up the risk rating against the cost, time and effort of a control measure.
For example, if a risk scores a 2 or 3 on the matrix, it’s probably not appropriate to spend large sums of money to reduce this risk.
A more cost-effective solution, which doesn’t reduce the risk to the same extent, could be the better option.
Decide on the additional control measures you need to put in place for each hazard before moving on.
Then, reanalyse the risk.
This involves assessing the updated (or, residual) risk to ensure your control measure works.
For example, if a hazard previously had a likelihood score of 3 and a consequence score of 4, then the total score would have been 12.
But, now, your control measure reduces the likelihood score down to 1.
Therefore, reducing the hazard’s total risk rating to 4. And, switching it from action to monitor.
Complete this for each hazard and move on to the penultimate step.
An all-important step!
Time to get all that previous analysis down on paper – if you haven’t already.
When filling out your risk assessment(s), be sure to include:
AND then, share these findings with your employees!
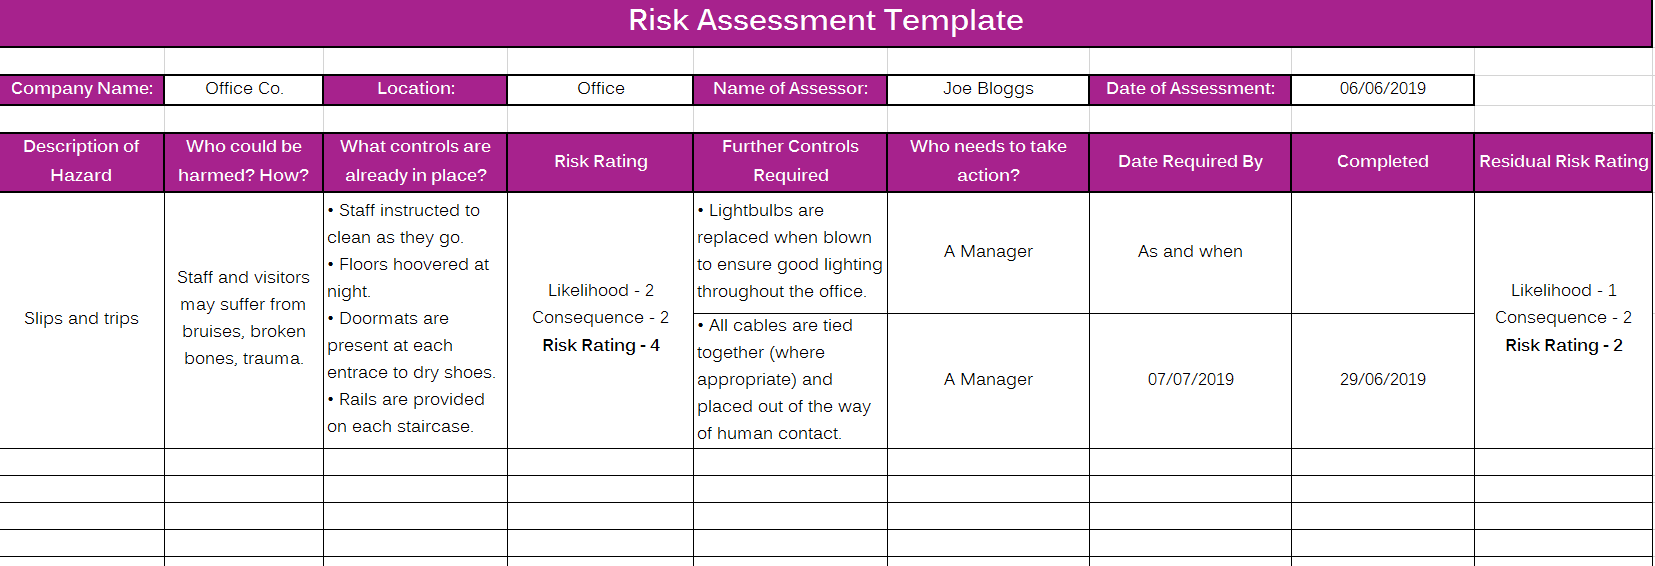
By doing so, your workforce can understand where your workplace risks lie and mitigate the chances of injury and illness occurring.
Download our template to start recording your findings. Or, take a look at some examples here.
Risk assessments are a continual process and need reviewing whenever there are changes to your workplace.
This could be the installation of new equipment or a new employee starting work.
Whilst reviewing your assessments, account for any new hazards and remove any redundant hazards from your records.
Additionally, if you identify any new issues or you experience a string of accidents & near misses, it may be time for an update.
As an employer, you are legally required to fill out ‘suitable and sufficient’ risk assessments for your workplace.
And, you must remember to regularly review your assessments.
They exist for a good reason – to ensure everyone has the best chance to go home healthy and happy from work.
In this post, we have seen how a 5-step process can help you create your own risk assessments with ease.
So, take the time to fill them out and you’ll protect your staff and save yourself from prosecution.
If you want to increase your health and safety knowledge, you can take one of our health and safety training courses.
Ever wondered what the consequences are of a health and safety breach?
In 2016/17, 554 companies were convicted of health and safety failings with a whopping £69.9 million was paid in fines.
In this blog, you’ll learn about two case studies where health and safety was ignored which will illustrate the consequences of a safety breach in the workplace.
Alongside this, you’ll find summaries of key legislation and a list of the best health and safety guidance.
Therefore, at the end of this post, you’ll have a deeper understanding of health and safety and the knowledge to help your business become safer.
Let’s begin with the Health and Safety at Work Act.
The Health and Safety at Work Act provides a basic framework for all places of work to follow to ensure safety as far as reasonably practicable.
Below is a summary of the major points.
In addition, the Health and Safety at Work Act is responsible for the creation of the Health and Safety Executive whose job is to enforce health and safety legislation in the workplace. However, that isn’t their only role…
The HSE has become a well-known figure in the UK as the regulator of health and safety in the workplace. And, many are familiar with its powers to inspect and prosecute businesses for health and safety failings.
After all, the main goal of the Health and Safety Executive is to prevent work-related death, injury and illness.
This video provides an overview of the HSE.
However, they play a few other roles as we can see from the list below.
But, the people investigation health and safety matters deserve a mention.
Due to the sheer quantity of businesses in the UK, the executive cannot inspect every one. Therefore, the HSE targets the highest risk industries (such as construction, agriculture, etc) and those with the greatest numbers of death, injury and ill health.

Let’s take a look at what the powers inspectors have in the event of serious injury or witnessing breaches in health and safety.
If they do find health and safety failures then they will use their powers to ensure that the breaches are righted.
Initially, an inspector will provide advice and guidance on how to correct any failings. However, when warnings are continually ignored the HSE will look to further its case against you and may start legal proceedings.
Similarly, in the event of a serious accident, you may face prosecution if it is deemed that your business did not implement safe working measures.
Now we will look at two case studies, each involving a different safety breach.
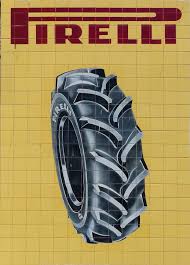
International tyre manufacturer, Pirelli, was fined over half a million pounds for a safety breach at their Carlisle factory.
On two separate instances, workers broke their arms after being dragged into the unguarded machine.
An investigation by the HSE found that the injuries were a result of inadequate guarding around the machine.
Therefore, the company was in breach of the Provision and Use of Work Equipment Regulations (PUWER) 1998 which states,
(1) Every employer shall ensure that measures are taken in accordance with paragraph (2) which are effective—
(a) to prevent access to any dangerous part of machinery or to any rotating stock-bar; or
(b) to stop the movement of any dangerous part of machinery or rotating stock-bar before any part of a person enters a danger zone.
Even after the initial incident, Pirelli failed to install proper guarding around the machine. Proper management of the health and safety risks associated with unguarded machinery would have identified the problem and build in preventative measures.
Pirelli pleaded guilty to breaching regulations and received a £512,000 fine and ordered to pay costs of £5,820.
A health and safety inspector commented,
“This machine should have been appropriately guarded from first use but, failing that, the first incident should have prompted a thorough review of the machine to identify what additional guarding was needed and appropriate action taken.”
Below, I have summarised the crucial points of PUWER.
Here is the second case study featuring a working at height breach.
A sole trader received a 6-month prison sentence (suspended for 18) after an employee fell from a height.
A staff member was working on site when he fell through a hole in the ground floor and subsequently suffered serious head injuries. The court ruled that the owner failed to protect his worker because of a lack of protection around the hole in the floor.
The Work at Height Regulations 2005 outlines the procedures necessary for any work in places where a person could fall a distance liable to cause personal injury – in this case, a hole through to the ground floor.
The ruling

The business owner pleaded guilty to breaching Regulation 6 (3) of the Working at Height Regulations 2005 which states,
“Where work is carried out at height, every employer shall take suitable and sufficient measures to prevent, so far as is reasonably practicable, any person falling a distance liable to cause personal injury.”
On top of his 6-month prison sentence, the sole trader paid costs of £8,442.
An HSE inspector was on hand to say,
“Falls from height remain one of the biggest causes of workplace fatalities and major injuries. Had the employer…implemented adequate control measures to protect the health and safety of his workers, this incident could have been prevented”
The following precautionary measures should have been taken:
Below, I have summarised the crucial points of The Working at Height Regulations 2005.

Employees
I will finish this blog off with a list of excellent resources relating to health and safety in the workplace.
There are plenty of great resources out there and so I thought I would compile a list for your use:
Make sure that you don’t leave yourself open to prosecution and even jail time by carrying out the right procedures and risk assessments.
And, when it comes to health and safety make sure that your business has the appropriate training and systems in place to ensure that all employees go home happy and healthy.
The companies mentioned in the case studies didn’t do that and they paid the price in the end!
Manual handling is one of the leading causes of workplace injury.
Approximately 8.9 million days were lost through musculoskeletal disorders in 2016/17.
No wonder the Health and Safety Executive has made tackling MSDs a priority over the previous few years.
By meeting manual handling legislation, you can take a big step in reducing injuries to your employees.
So, we’ve created this post which will summarise the critical information contained within these regulations.
Knowing this, you’ll understand what you can do to work safer in your business.
But first, let’s start by defining ‘Manual Handling’.
Most people consider manual handling as lifting heavy objects from one place to another.
But it’s considered more than just lifting.
Activities such as pushing and pulling are also included.
Moreover, it isn’t just “heavy” items.
It can be ANY load – heavy or light.
If you look at the Manual Handling Operations Regulations 1992, it will define a manual handling activity as:
“…any transporting or supporting of a load (including the lifting, putting down, pushing, pulling, carrying or more moving thereof) by hand or by bodily force”
And, how does this cause so many injuries?
Watch this video where our trainer, Mark, explains how injuries occur.
With this in mind, we shall look at the legislation that covers manual handling activities.
Currently, two pieces of legislation place duties on employers and employees with regards to manual handling:
We will now take a greater look into the contents of each.

Within this legislation, employers face certain duties to ensure they protect employees from injury.
Employers should avoid manual handling activities where “reasonably practicable”.
Therefore, you can eliminate any risk.
For example, using a forklift to move a pallet rather than an employee moving individual boxes.
However, avoiding all manual handling operations is impractical.
Enter stage two of the hierarchy.
Employers must make suitable and sufficient assessments of manual handling activities
As you may have guessed, this does mean compiling a risk assessment or risk assessments (depending on how many manual handling operations your business may undertake).
These will inform your decisions made in stage 3 of the hierarchy.
Employers must try to reduce the risk of injury and illness where reasonably practicable.
You’ve conducted your assessments, now it is time to act.
Every measure should be taken (where reasonable to do so) to prevent injury from manual handling activities.
It is easy to forget that employees aren’t exempt from responsibility.
Employees must follow the systems of work put in place by their employer.
Let’s move on to the sections of the Health and Safety at Work Act 1974 that apply to manual handling activities.
The HASAW act outlines the general health and safety duties placed on employers and employees in the workplace.
In fact, section 2 states,
“It shall be the duty of every employer to ensure, so far as is reasonably practicable, the health, safety, and welfare at work of all his employees.”
Additionally, there are other sections which are relevant to manual handling such as:
One way you may wish to reduce your risk is through training employees.
So, we will now look at what good manual handling training involves.
Whether it is in-house or through an external provider, manual handling training is a great way of reducing the risk posed to your employees.
So, what does good training involve?
Topics that should make up your training include:
Bear in mind, that the best training makes discusses content relevant to the load, individual, task, and environment involved.
In fact, the HSE have recently urged businesses not to invest in generic, off-the-shelf style manual handling courses. Furthering the need for onsite courses in the future. Check out this press release from them!

Note: No amount of training can overcome the lack of mechanical aids; unsuitable load and/or bad working conditions.
High numbers of injuries relating to manual handling make it important that businesses meet the current regulations.
Therefore, manual handling legislation is a need to know subject.
After reading this article, you are in a better position to put policies in place to better protect your workforce.
Got a question? Leave it in the comments and we will get back to you with an answer.
Fire hazards are present in every business, big or small.
And, you need to know how to identify them when you are completing your fire risk assessments.
But what makes something a fire hazard?
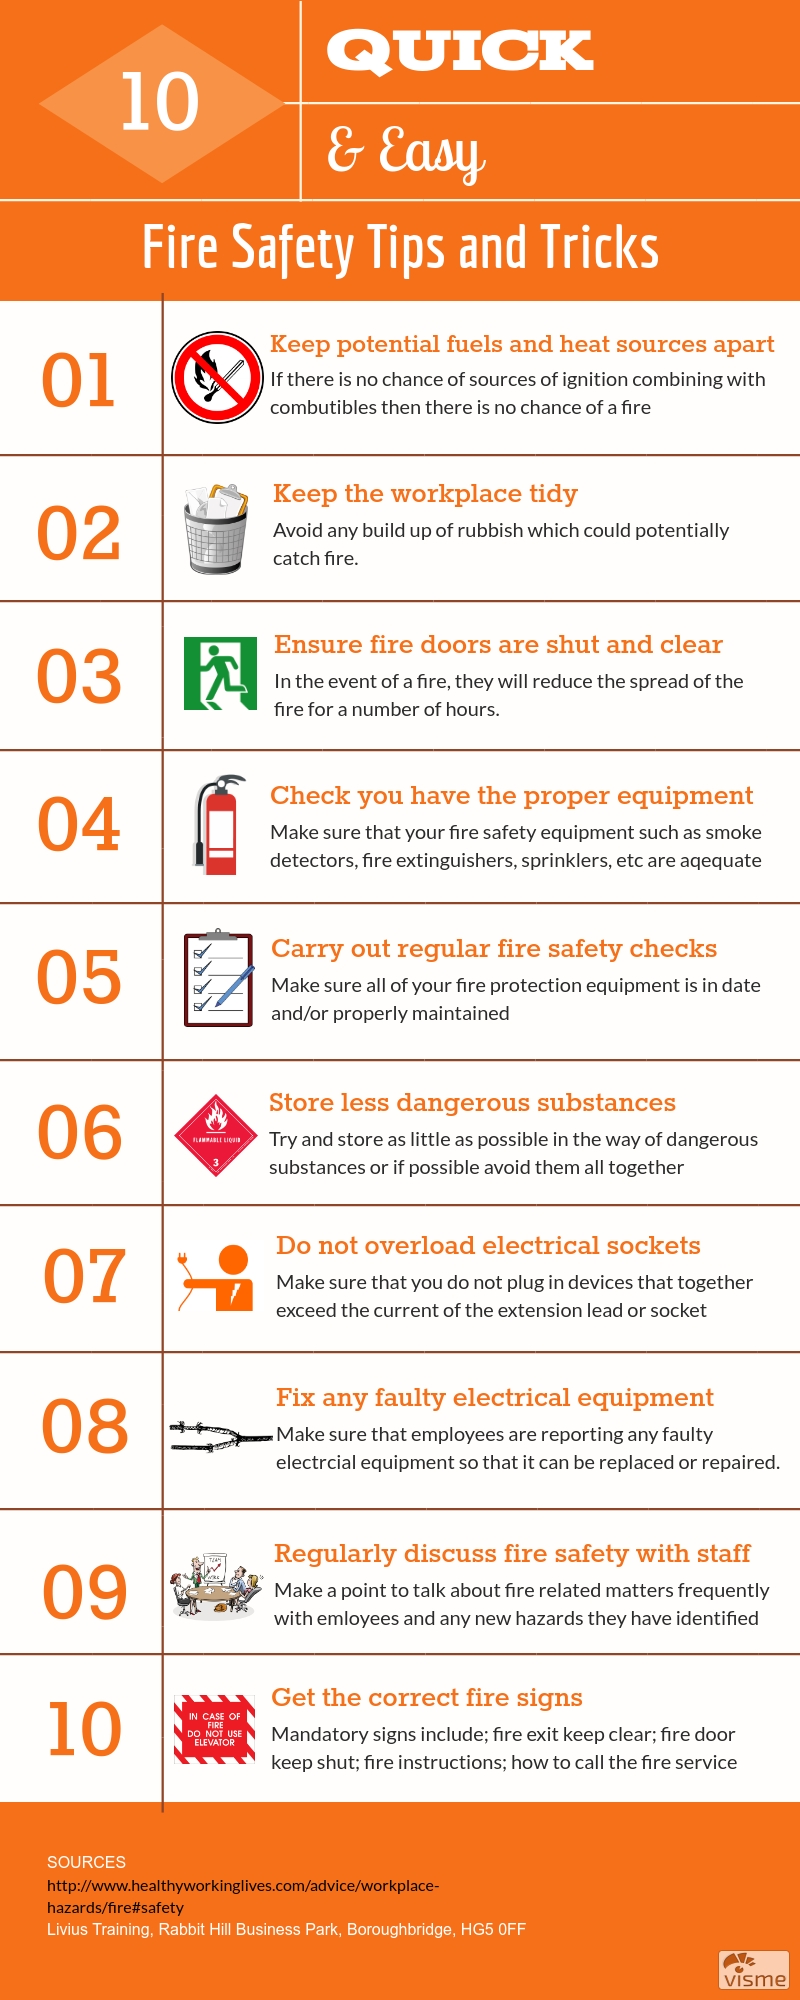
Read this post to find out the answer to this question as well as simple fire safety tips you can use in your workplace.
Without further ado, let us begin with a bit of background to fire safety.
The fire safety statistics for 2016/17 show that emergency services attended over 175,000 fires in the UK.
As a result, there were over 250 fatalities.
Without proper care and precautions fires are easily started with the potential for deadly consequences.
Which is why identifying the fire hazards in your workplace is important.
Fire hazards are given the definition of “anything that increases the chances of a fire occurring”.
But, what does this really mean?
Well, fire requires 3 things:
This is often represented by the fire triangle shown opposite.
Lose either oxygen, fuel or heat and a fire will die out.
Therefore, fire safety involves restricting 1 of these 3 things.
As a result, a fire hazard can be defined as either a fuel or a source of ignition.
Here are some common workplace examples.
With these in mind, identifying hazards in the workplace becomes easy.
Using the examples provided above can give you an idea of the fire safety risks you may face in your business.
But to discover further risks, ask yourself these two questions:
These questions will help you to discover the fire hazards faced in your workplace.
Consequently, you must put adequate measures in place to mitigate these risks.
When assessing your risks consider the following questions:
The answers to these questions need to be provided in your risk assessment where you set out the preventative measures you will put in place.
Furthermore, you’ll need to record your procedures, plan them out and then inform employees of their existence.
Find a template hereor if check out our fire marshal training.
Before we move on to some simple fire safety tips, we’ll discuss a special category of fire hazards…
Dangerous substances are “any substances used or present at work that could, if not properly controlled, cause harm to people as a result of a fire or explosion or corrosion of metal”
Often, dangerous substances must comply with stricter regulations because of their higher risk.
Examples include:

Significant time should be taken analysing the possible risks and precautions that need to be taken.
For more information on dangerous substances, read the DSEAR Regulations 2002.
Next up, simple tips to improve fire safety.
Now, Let’s bring everything together with a case study.
In this example, a restaurant regularly threw out their used cardboard boxes and left them to pile up outside.
However, when an employee went outside to smoke, they dropped their cigarette butt onto the floor.
Unfortunately, the butt was still lit, and the cardboard set alight.
The resultant fire caused severe damage to the restaurant and a full evacuation.

Firstly, the hazards should have been identified.
i.e.
Source of Ignition – Cigarette end
Source of Fuel – Waste cardboard box
Then, after completing a risk assessment, appropriate measures should have been taken to avoid or minimise the risk.
i.e
But, what parts of the law actually require fire risks to be assessed?
Fire safety in the workplace is governed by the Regulatory Reform (Fire Safety) Order 2005.
This states that a responsible person (an employer or any other person in control of part of the premises) must:
Make a suitable and sufficient assessment of the risks to which relevant persons are exposed for the purpose of identifying the general fire precautions he/she needs to take to comply with the requirements and prohibitions imposed by or under this Order.
It is plain to see that assessing your fire hazards as part of your fire risk assessment is a legal obligation.
Key Tip: Set aside time every month to discuss fire safety matters with your employees and whether they have identified any new problems.
If you neglect the law, you are leaving yourself open to legal implications like the company below.
A Sheffield hotel owner was jailed for breaching the fire safety legislation.
Responding to a fire, inspectors found: no working fire alarms; an unsuitable risk assessment; inadequate amounts of fire detectors; no emergency lighting and insufficient levels of training for hotel staff.
What should the hotel have done?
Read the full article here.
Fire hazard identification is extremely important for your business.
Without it, you won’t be able to complete a risk assessment, therefore, you’ll be unable to put the necessary measures in place to prevent fires from starting.
However, if you manage to stay on top of this, you’ll stay on the right side of the law.
What fire hazards have you noticed in your workplace? Let us know in the comments!